• Skip to primary navigation
  • Skip to main content
  • Skip to primary sidebar

Carnegie Museum of Natural History

One of the Four Carnegie Museums of Pittsburgh

  • Visit
    • Buy Tickets
    • Visitor Information
    • Exhibitions
    • Events
    • Dining at the Museum
    • Celebrate at the Museum
    • Powdermill Nature Reserve
    • Event Venue Rental
  • Learn
    • Field Trips
    • Educator Information
    • Programs at the Museum
    • Bring the Museum to You
    • Guided Programs FAQ
    • Programs Online
    • Climate and Rural Systems Partnership
    • We Are Nature Podcast
  • Research
    • Scientific Sections
    • Science Stories
    • Science Videos
    • Senior Science & Research Staff
    • Museum Library
    • Science Seminars
    • Scientific Publications
    • Specimen and Artifact Identification
  • About
    • Mission & Commitments
    • Directors Team
    • Museum History
  • Tickets
  • Give
  • Shop

Kathleen

December 7, 2022 by Kathleen

A New Building at Powdermill

by Luke DeGroote

On a crisp fall morning, 30 minutes before the sun rises, the bird banding crew at Powdermill Avian Research Center (PARC) are hard at work setting up the mist nets for a typical day. As the dewdrops fall from the nets and the birds call, everything seems as normal as it has since 1961, but something is different. For the first time, the birds will be processed in a new location. PARC has finally established a new home.

On September 30, 2022, we celebrated the Grand Opening of the Richard P. Mellon Avian Research Center. This new facility is a great leap ahead for PARC that will allow us to continue conducting our avian research as we have since 1961, while also providing new opportunities for outreach, additional research projects, and more efficient data collection. A 60-second video tour provides visual orientation to the facility.

View this post on Instagram

A post shared by Powdermill Nature Reserve (@powdermillnaturereserve1956)

So, what’s inside? The new building consists of a bird holding room, research lab, seminar space, kitchen/lounge, offices, a multi-use lab space, and an observation deck.

Bird Holding Room: This space is used by the bird banding techs. It allows easy access to the bird bags, radios, and carabiners, and has spaces for the birds to await their turn to be processed in the lab. The addition of this room frees up lab space and prevents the processor, recorder, and bird banders from being interrupted while collecting data.

room with an l-shaped desk with bird banding equipment on it

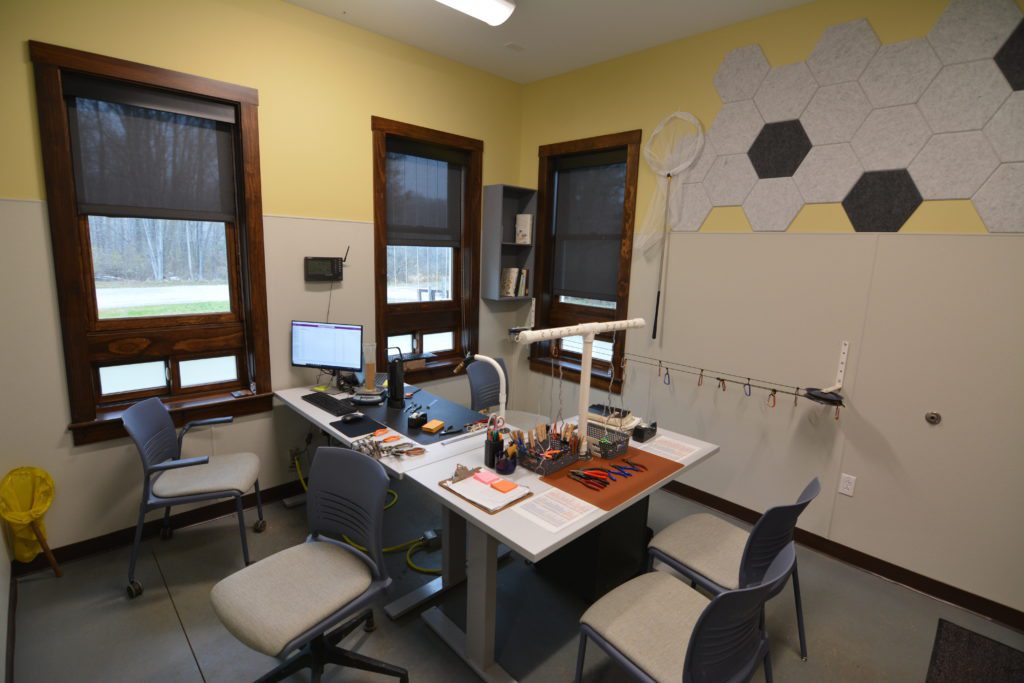
Research Lab: This room mirrors the original setup in the old building. Birds are banded and processed here on a day-to-day basis. PARC’s bird banders have captured and processed over 800,000 birds with many more to come in the lab’s future.

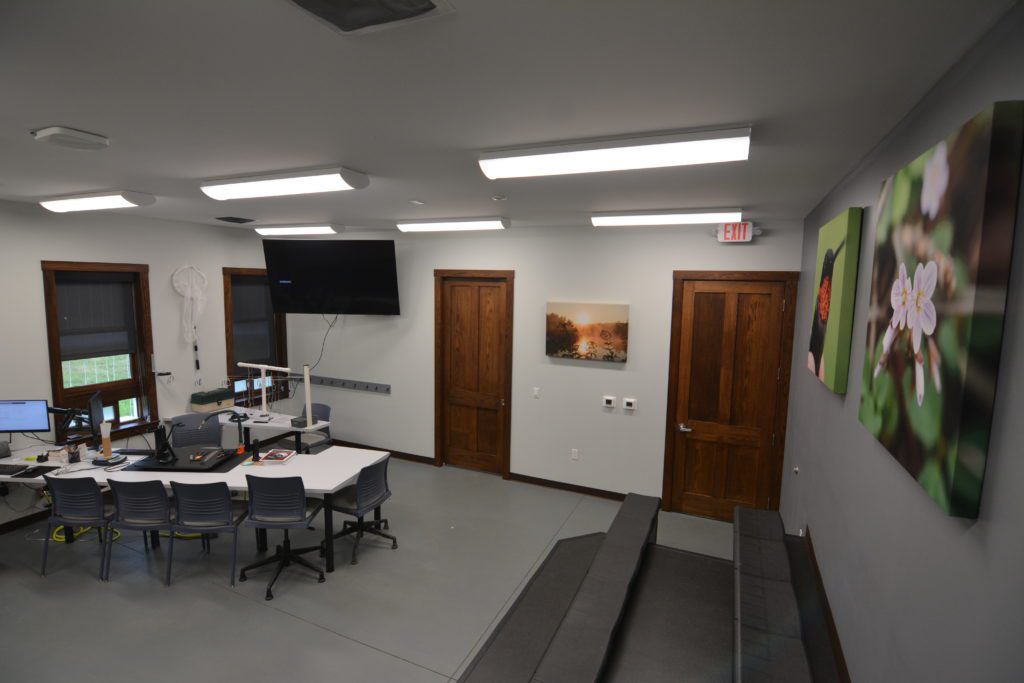
Seminar Space: This classroom space will now allow large groups to visit us for field trips, open houses, and guided tours. This space has a similar setup to the research lab with the addition of lecture-style seating and a video screen that allow groups to see bird banding up close and learn about PARC’s many avian research projects.

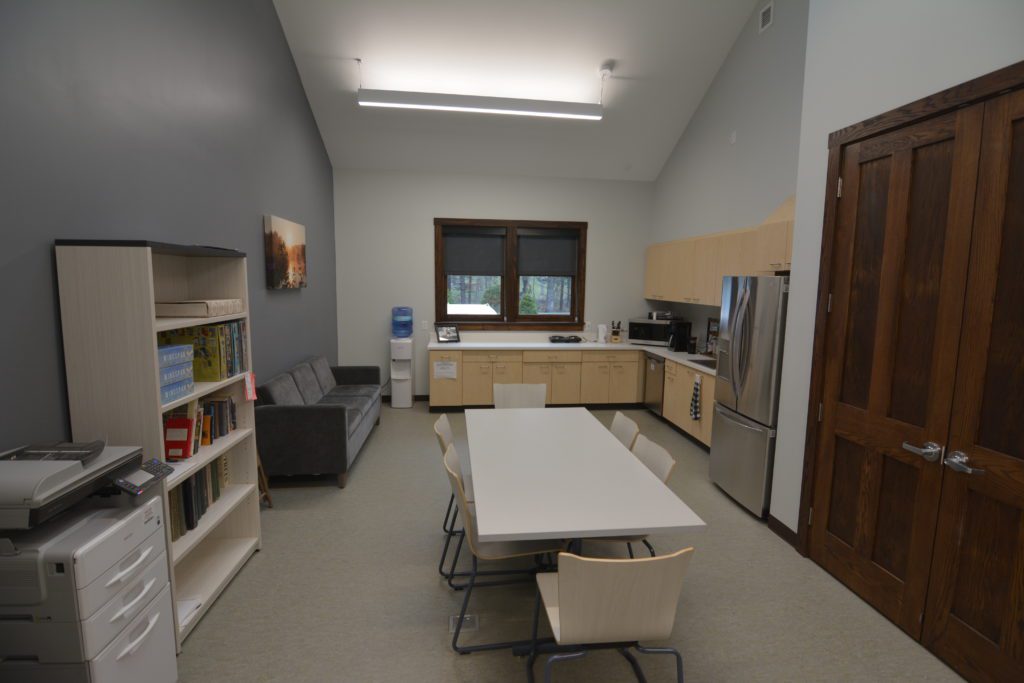
Kitchen/Lounge: This is a much-needed space where we can fuel up on coffee for our early mornings or late nights, or where workshop participants can take a snack break. It’s also a fantastic place to play our favorite board game (Wingspan, of course).

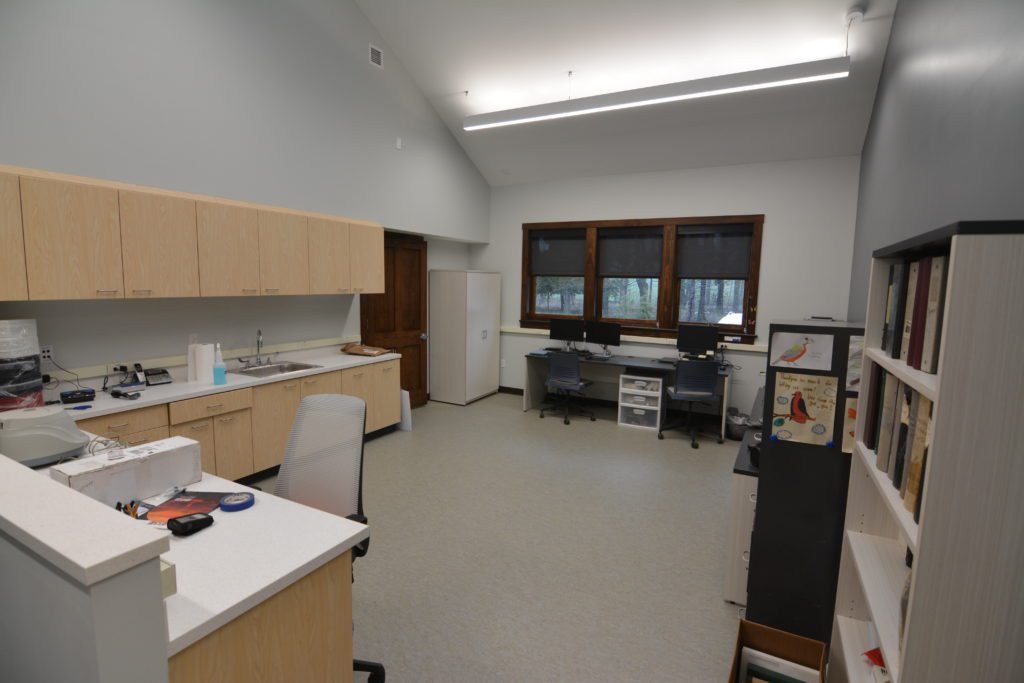
Lab: This multi-use space has proved to be a great addition for PARC staff and collaborators. There are desks and computers for the Avian Outreach Tech, Flight Tunnel Tech, and visiting researchers. The space is also utilized for data proofing and ongoing research projects.

Although the move from the original building was bittersweet, we are so thrilled to continue conducting avian research from this new space. Thank you so much to everyone who helped this new building come to life. The opportunities with this new building are endless.

Luke DeGroote is Avian Research Coordinator at Powdermill Nature Reserve, the museum’s environmental research center.

Related Content

An Intern’s Experience Studying the Ecosystem at Powdermill

Chimney Swift Conservation

Encounter With an Orb Weaver Spider: Is It Predator or Prey?

Carnegie Museum of Natural History Blog Citation Information

Blog author: DeGroote, Luke
Publication date: December 1, 2022

Share this post!

  • Share on Twitter Share on Twitter
  • Share on Facebook Share on Facebook
  • Share on Pinterest Share on Pinterest
  • Share on LinkedIn Share on LinkedIn
  • Share on Reddit Share on Reddit
  • Share via Email Share via Email

Filed Under: Blog Tagged With: Luke DeGroote, Powdermill Nature Reserve, Science News

October 22, 2021 by Kathleen

Spider Craft Activity

by Riley Riley

For this simple craft, you will need 5 pipe cleaners, scissors, and any (optional) decorative items to create a spider that you can place or hang around your space.  This activity requires a grown-up!

Spiders are an incredibly diverse group of arthropods that come in nearly every color, so don’t be afraid to get creative with the colors and decorations you use for your spider creation!

If you would like to know the names of some colorful and unique spiders, please check the list at the end of this guide to use in your future spider exploration!

Required materials for the craft activity and examples of optional decorative items like pom poms and googly eyes.

Instructions

  1. Spiders, like all arachnids, have eight legs. So, the first step is to cut four pipe cleaners in half to make eight pieces that will be used as your spider’s legs.
  2. We will use the remaining full pipe cleaner to create the spider’s body. First form a circle with the pipe cleaner and twist the ends together so that the circle remains closed.
  3. Spiders have two body segments, the abdomen and the cephalothorax. To create these two segments, pinch and twist the circle so that it forms a figure eight.
  4. Now it is time to attach the legs of your spider! All eight of a spider’s legs are attached to its cephalothorax, so choose one side of your figure eight to designate as the cephalothorax and begin attaching the legs. To do this, take one of the leg pieces and hook it around the side of the body. Twist the end of the leg piece to secure it to the body. Repeat this step seven more times until you have four legs on each side of the body.
  5. At this stage, your spider is finished being constructed! You can leave your spider like this or you can bend the legs to create more of a 3-dimensional creature. This is when you can add any embellishments like pompoms, beads, or eyes to your spider as well.
Four pipe cleaners cut in half and one full length pipe cleaner
Full length pipe cleaner folded into a circle to make the body of the spider
Pipe cleaner twisted into a figure eight to form the body of the spider
Step one of attaching a leg to the body
Step two of attaching a leg to the body
Finished spider with its legs laid flat
spider made of pipe cleaners
Finished pipe cleaner spider with its legs bent
Finished pipe cleaner spider with yarn and decorative pompoms added at the end of each leg

If you would like to hang up your spider, you can represent its spinnerets – the silk producing organs – by tying a piece of string or yarn to the end of the abdomen (the body segment without the legs).

Finished pipe cleaner spider hanging from a piece of yarn

The Spider Rainbow

Red – Dominican Spider (Alcimosphenus licinus)

Orange – Shamrock Orb-weaver (Araneus trifolium)

Yellow – White-banded Crab Spider (Misumenoides formosipes)

Green – Green Huntsman Spider (Micrommata virescens)

Blue – Singapore Blue Tarantula (Lampropelma violaceopes)

Purple – Ecuadorian Purple Tarantula (Avicularia purpurea)

Pink – Pink Crab Spider (Thomisus onustus)

Newton, B., & Bessin, R. (2009, November 19). Spider Anatomy. Kentucky Critter Files – University of Kentucky Department of Entomology. Retrieved September 30, 2021, from https://www.uky.edu/Ag/CritterFiles/casefile/spiders/anatomy/spideranatomy.htm.

World Spider Catalog (2021). World Spider Catalog. Version 22.5. Natural History Museum Bern, Retrieved September 30, 2021, from http://wsc.nmbe.ch  doi: 10.24436/2

Riley Riley is a Gallery Experience Presenter in CMNH’s Learning Department. Museum staff, volunteers, and interns are encouraged to blog about their unique experiences and knowledge gained from working at the museum.

Filed Under: Visitor Info Tagged With: Super Science, Super Science Days, Super Science Saturday

June 22, 2021 by Kathleen

Super Science Coloring Pages!

Have fun coloring images featuring animals from our living collection this week drawn by Gallery Presenter and Floor Captain, Jess Sperdute. You can meet some of the animals in the living collection during our Virtual Live Animal Encounters!

coloring page of skunk rock star
Download PJ the Skunk as a Rock Star Coloring Image
coloring page of coati rock star
Download Lupe the Coati as a Rock Star Coloring Image
coloring page of hedgehog rock star
Download Earl the Hedgehog as a Rock Star Coloring Image

Filed Under: Blog, Super Science Saturday Tagged With: sssminerals, Super Science

May 20, 2021 by Kathleen

Super Science Activity: Snail Sensory Bag

By Emma McGeary, with scientific information provided by Dr. Tim Pearce, Curator of Collections & Head in the Section of Mollusks

This activity has a few steps, but it’s a great way to explore something really unique— the fluorescing slime of various land snails!

Dr. Pearce says that malacologists (people who specialize in the study of mollusks, like snails and slugs) aren’t sure yet as to why some snails have fluorescing slime, they have a few theories. For example, the slime of Mountain Tigersnails (Anguispira jessica), does not typically fluoresce. However, the slime produced as a defense mechanism by Mountain Tigersnails, which is a yellow-orange color, does fluoresce. With this information, Dan Dourson, a Biologist, suggested that the fluorescing slime could possibly be a way for the snails to protect themselves. If a predator saw the bright slime under the light of the moon, it could make them no longer want to prey upon the snail. Flamed Tigersnails (Anguispira alternata) have been found to have fluorescing slime as well.

Dr. Pearce also mentioned that this fluorescence may also be something not meant to be functional, but rather a “side effect” of evolution that serves little purpose. Because scientists are still searching for an answer, they have to look critically at all different kinds of possibilities.

Questions to Consider

Could the slime be a functional way to keep the snails safe? If so, when might they encounter UV light in the wild? Is the fluorescing quality of this snail slime a byproduct, or result, of evolution? If that’s the case, what evolved traits could have caused it? If you think that the fluorescent slime has nothing to do with defense or a random act of evolution, then what else could be behind the mystery? Using your knowledge of the natural world, see if you can think of explanations as you work on your own snail slime sensory bag.

Make-Your-Own Snail Sensory Bag

supplies to make snail slime

What You’ll Need

  • 1 Bottle (6oz) of Elmer’s Clear Glue (this type of glue works best)
  • 1.5 Teaspoons Baking Soda
  • 1.5 Teaspoons Contact Lens Solution (I’m using Bio True)
  • Bowl
  • Spoon (or another mixing utensil)
  • Sealable plastic bag
  • Food coloring or paint (optional)
  • Permanent Marketing (optional)
  • Beads (optional)
  • UV light (optional)

Directions

mixing slime
  1. Empty your bottle of clear glue into your bowl. If you are adding food coloring or paint, this is the best time to add it!
  2. Add your baking soda to the glue and stir.
  3. Add your contact solution and stir.
  4. You may need to knead this slime with your hands to have it become less sticky.
  5. Add your slime to your bag and close it. If you would like to turn this sensory bag into a sensory activity, draw a snail onto the front of the bag. Make sure the shell is large!
  6. Add your beads, if you would like. You can use your fingers to move the bead in the bag around. See if you can color in the snail shell by moving the beads into it!

I made sure to use a neon paint for this bag so that it would glow under my UV light! The beads I added were glow-in-the-dark beads, which also meant they glowed under the UV light.

The mystery of fluorescing snail slime is only one of the many things that have caught Dr. Pearce’s interest. He has also been researching their decline and disappearance throughout Northeast North America, which may be attributed to past decades of acid rain and determining the amount of Anguispira species there are on the continent as well. Dr. Pearce says that the attempt to find that number is a large collaborative effort that involves looking at the snail’s DNA and taking trips out to collect specimens. While out in the field, Dr. Pearce has also attached spools of thread to snail shells to track their movement in the wild!

finished sensory slime bag project

Sometimes, finding an answer to a scientific question can take a long time and many discussions with others. Now that you’ve learned a little more about how snail slime works and the unique type of slime that certain snails have, think about how you could put your own theories to the test, and what else you could learn about snails by observing them in their natural environment!

Of course, no discussion of snails could be complete without one of Dr. Pearce’s famous snail jokes:

What do tiger snails have that NO OTHER animal has?

Baby tiger snails!

Emma McGeary is a Gallery Experience Presenter in CMNH’s Life Long Learning Department.

Filed Under: Blog Tagged With: Bug Bonanza

May 20, 2021 by Kathleen

Super Science Coloring Pages!

Have fun coloring images featuring animals from our living collection this week drawn by Gallery Presenter and Floor Captain, Jess Sperdute. You can meet some of the animals in the living collection during our Virtual Live Animal Encounters!

Sun Conure and Sun Snail coloring page
Download Sun Conure and Sun Snail Coloring Image
Godzilla and Mothra coloring page
Download Godzilla and Mothra Coloring Image

Filed Under: Blog, Super Science Saturday Tagged With: Bug Bonanza

March 31, 2021 by Kathleen

Super Science Activity: Paper Flowers

Spring is here, and the flowers are blooming! Not all flowers bloom at the same time, but with these instructions and a few supplies, you can make your own beautiful paper bouquet of spring flowers that will last all year. Plus, learn a few facts about their living counterparts and why plants are more interesting than you might think with Mason Heberling, assistant curator and Sarah Williams, curatorial assistant in the Section of Botany at the museum! *This activity requires a grown-up!

Before we start, let’s talk about spring flowers!

Many plants that go dormant in the winter, or stop growth, like hibernation for plants respond to certain cues so that they emerge and bloom at the “right” time. These cues include spring temperatures, length of daylight, known as photoperiod, and a set length of cold period (known as vernalization or “winter chilling”). It’s complicated and we are still learning how different species respond differently to each of these cues.

Like many spring flowers, both in your gardens and in the woods, the plants we are making today have big belowground structures called bulbs.  Perennial plants with bulbs are known as geophytes (“geo” meaning earth and “phyte” meaning plant), these belowground bulbs come in many forms but serve as storage for energy (sugars) and water. Many geophytes can live many years and because their bulbs are protected belowground, have evolved to withstand many stresses, including fire, extreme temperatures, lack of water, and more. When the soil warms, sometimes even the slightest amount, in the spring, these belowground bulbs fill with water, cells expand, and out of the ground comes the beautiful flower!  These flowers are not only beautiful to us—they signal to attract insects and wake up the web of life in our region.

supplies to make paper flowers

What You’ll Need

  • Colored construction paper or card stock (make sure to have green paper for the stems!)
  • Scissors
  • Pencil
  • A small surface to roll paper (this project used the end of a paintbrush)
  • A ruler
  • Glue
  • *OPTIONAL* Green Pipe Cleaners for stems instead of green paper

How to Make a Paper Hyacinth

  1. Measure and cut a 9×2 (or, if you are using cardstock, 8/8.5×2) rectangle from your colored paper (this is for the flower portion, please see the directions below on how to make stems and leaves. Measure out 3/8’’ from the bottom of your 9×2 rectangle and draw a line across the entire length of one side. Cut out small rectangles roughly 1/4’’ in size (these don’t need to be accurately measured and look more natural when a little different in sizes!), stopping before the pencil line at the top of the rectangle.
  2. Repeat your cuts across the length of the entire rectangle. Flip your rectangle over to hide the pencil marks.
  3. Using a small surface to roll your paper (like a pencil), roll each strip tightly (it’s ok if they loosen at any point during construction, just make sure they’re still rolled a little).
  4. Flip your rolled-up strips so that your pencil marks from earlier are facing up
  5. Glue along the bottom of the rectangle
  6. Make a paper stem and some leaves, or use green pipe cleaners. Holding your stem and your rolled-up strips, begin by placing the end of the roll to the top of the stem and slowly work your way down by spinning the stem (this may take several minutes—just go slowly and hold your roll to the stem for a few seconds until it has a chance to stick!). Continue down until the end of the roll
  7. Wait for the glue to fully dry before adding leaves
making a paper hyacinth by cutting paper into strips, rolling and gluing it

How to Make a Paper Daffodil

  1. Cut out a 4×4 square from your paper
  2. Fold your paper diagonally to make a triangle.
  3. Fold your paper in half two more times to make a smaller triangle.
  4. Cut a petal shape from the end of the outer corner of you triangle to the inner corner where all of the folds meet. Cut off the tip of the inner corner of your triangle.
  5. Cut a circle out of your paper (size doesn’t matter, but don’t make it too small!).
  6. Cut your circle in half.
  7. Using one half of your circle, fold it into a cone.
  8. Unfold your petal shape from step 4—it should look like a flower with a hold in the center (if it doesn’t, repeat the first steps and cut the petal shape from the opposite direction). Glue your cone from step 7 into the middle of the flower and hold it in place until the glue dries.
  9. Gently push your cone through the center of the daffodil and glue where the sides of the cone meet the petals.
  10. Create a stem (or use pipe cleaners), and glue the end of the stem to your daffodil.
  11. Hold the daffodil in place for a few moments while the glue dries.
  12. Create a leaf or two and glue to your stem.
steps to make a paper daffodil including folding and cutting paper shapes

How to Make a Tulip

  1. Cut out three 3×3 sheets of paper. Stack the papers on top of each other and fold them in half.
  2. Draw a petal shape on the side of the fold.
  3. Cut out the petal shape using the pencil lines as a guide.
  4. Take one petal and glue both sides. Place the other two petals on either side of the glue. Hold down the petals gently until the glue dries.
  5. Create a stem (or use pipe cleaners), and glue the end of the stem to your tulip.
  6. Create a leaf or two and glue to your stem.
steps to make a paper tulip by cutting shapes

About Hyacinths

hyacinth herbarium sheet
  • Hyacinth has a single dense spike of fragrant flowers in shades of red, blue, white, orange, pink, violet or yellow
  • Hyacinth bulbs are poisonous; they contain oxalic acid. Handling hyacinth bulbs can cause mild skin irritation. Protective gloves are recommended.
  • Very fragrant, commonly used in perfume
  • Though only including three species, Hyacinths have been grown in gardens and bred over the past centuries, with thousands of named varieties (known as “cultivars”)
  • Wild hyacinths are native to Mediterranean and western Asia (including Israel, Lebanon, Syria, Turkey) but are widely grown around the world.

About Daffodils

daffodil herbarium sheet
  • Though known by human cultures long before and grown for many centuries, Carl Linnaeus formally described and named Narcissus in his famous book Species Plantarum in 1753. The genus was also described in the Flora of North America in part by former Carnegie Museum of Natural History Curator of Botany, Frederick H. Utech, who studied many species in the Lily family, including daffodils.
  • Daffodils include many species and varieties, native to the Eastern Mediterranean, but very hardy, growing very well across North America.  It is not uncommon for daffodils to get snowed on and still bounce back!  It has even naturalized in many areas, meaning it can survive without a gardener’s help outside of gardens.
  • In Germany the wild narcissus, N. pseudonarcissus, is known as the Osterglocke or “Easter bell.” In the United Kingdom the daffodil is sometimes referred to as the Lenten lily.

About Tulips

tulip herbarium sheet
  • Tulips have a very long human history of cultivation, dating back more than a thousand years.
  • Tulips were once so popular in the Netherlands that they were used as money in the 1600s!
  • Seeds take 7-12 years before they’ll form a flowering bulb
  • In Amsterdam, you can go on tours of whole fields and greenhouses of Tulips.
  • Tulips are native to N. China / S. Europe, cultivated in Turkey by the Ottoman Empire, imported to Holland in the 1500s.

More from our Botanists

What exactly is a botanist? What types of plants do you study?

A botanist is someone who is curious about plants. That’s it! No degree required, you don’t need to be a professional botanist, but you certainly can be!  Like many botanists, I am interested in many different types of plants, but in particular, study plants in our forests, especially our native spring wildflowers. 

Why is this information important? Does it connect to other sciences?

The understory layer in our forests comprise many different types of species. In fact, there are far more species in the understory than the overstory!  Beyond their beauty, they serve important roles in the how our ecosystem functions – from the flow of nutrients and regulating our climate to feeding bugs, birds, and animals that depend upon them.  In particular, I study the impacts of climate change and introduced species in our forests. I use field experiments, observations, and our museum collections to understand the past, present, and future of the plant which we all depend.  Botany connects to many areas of science, including agriculture (the food we eat!), medicine, environmental chemistry, and many more. The Section of Botany has even been consulted in legal cases and crime scene investigations.

How long have you been a botanist?

Dr. Heberling: I’ve been fascinated by plants since college, but I actually didn’t refer to myself as a “botanist” until later.  Even earlier, I loved nature as a kid and grew up with a garden.  Yet, I did not really discover plants as a career or calling until college. I thought I had to be a doctor to go into biology, or at least had to study animals. But at some unknown point, it clicked – plants are incredible and incredibly important! My path to becoming a museum curator was driven by my interests and only partially planned. There are many avenues to explore, many equally as fulfilling and important.  And I’m fortunate to have landed where I have, in a collection of more than half a million specimens, studying the power of plants.

What is your favorite flowering plant?

Dr. Heberling: My favorite spring flowering plant: There are many!  But I have a special liking to our native Trillium species. Seeing a forest full of Trillium is an experience like no other. 

Sarah Williams: Hyacinth because the smell is wonderful. Forsythia because it’s the first sign for me that it’s really real Spring is here. Dutchman’s breeches because they’re pretty and look like tiny teeth.

If a child is interested in plants, what career paths could they follow and where is a good place for children to start that path?

Dr. Heberling: Get outside!  That’s the best place to start. It need not be somewhere exotic. Observe. Notice what you notice.  Then, start trying to identify what’s around you.  Join scouting if you can, or similar groups. The best thing is to discover your passion. There are many careers that involve plants – they not only are part of the landscape, but they ARE the landscape.  From agriculture to parks/recreation to many areas of conservation and scientific study – many careers directly involve plants.

Filed Under: Blog, Super Science Saturday Tagged With: sssegghunt, Super Science Days

  • Page 1
  • Page 2
  • Page 3
  • Interim pages omitted …
  • Page 13
  • Go to Next Page »

sidebar

About

  • Mission & Commitments
  • Directors Team
  • Museum History

Get Involved

  • Volunteer
  • Membership
  • Carnegie Discoverers
  • Donate
  • Employment
  • Events

Bring a Group

  • Groups of 10 or More
  • Birthday Parties at the Museum
  • Field Trips

Powdermill

  • Powdermill Nature Reserve
  • Powdermill Field Trips
  • Powdermill Staff
  • Research at Powdermill

More Information

  • Image Permission Requests
  • Science Stories
  • Accessibility
  • Shopping Cart
  • Contact
  • Visitor Policies
One of the Four Carnegie Museums | © Carnegie Institute | Privacy Policy | Terms of Use | Accessibility
Rad works here logo